In the Content Fabric, ingesting video for streaming involves two kinds of objects, Production Masters and ABR Mezzanines:
Production Masters
Usually very high bitrate/resolution
Often encoded with Prores / JPEG2000 video and PCM (raw) Audio
Accessible only to content owners / admins
Not directly viewable from Content Fabric (yet)
Made up of 1 or more media files (referred to as Sources) that are often kept in AWS S3, although if desired they can also be uploaded to the Content Fabric and stored there
Defines 1 or more Variants, e.g.:
Theatrical release version
TV broadcast version
In-flight version
Market- or country-specific version(s)
Unless otherwise specified, on initial creation always starts with one Variant named default
A Variant specifies which files (Sources) to use and which stream(s) to include from each.
ABR Mezzanines
Generally lower bitrate and/or resolution than Production Masters
Encoded with h264 or h265 video and AAC audio
Directly viewable from the Content Fabric
Stored in the Content Fabric
Optimized for low-latency streaming
Can contain custom metadata, e.g.:
Internal asset ID
External ID(s)
Synopsis, Ratings, Genre, Cast, Crew
Defaults (usually English)
Territory and/or language-specific overrides
Defines 1 or more Offerings. Each Offering specifies the following:
What Production Master and Variant within to stream
What resolutions and bitrates to offer
What streaming protocol(s) to offer (DASH and/or HLS) and what kind(s) of DRM to use for each (an Offering can include both DRM and clear playout options if desired)
Watermark text or image (if any)
Caption/subtitle streams (if any)
Whether to trim media from the beginning and/or end of the Production Master's Variant and if so how much
An Offering initially contains the same streams as the Production MasterVariant that was used to create it, but can be edited after creation to add or remove streams (e.g. adding a subtitle stream or removing an audio language track)
The ingest process consists of the following steps:
Create a Production Master object that points to your master source files (alternately, local master source files can be uploaded to the fabric)
Create an ABR Mezzanine object that points to the Production Master and adds streaming resolutions / bitrates as well as any DRM / watermarking. Once you create the mezzanine, the Content Fabric will begin transcoding.
Finalize the ABR Mezzanine after transcoding has finished.
(Optionally) Setting trim points and/or adding subtitles
NOTE: Although currently caption/subtitle files are added to ABR Mezzanines separately after creation, in the future this may be changed so that they are part of the original Production Master instead.
Enter the password you chose when first setting up your account
Click on the eluv.io logo at top left
Click on Profile
Click on the key icon to reveal your private key (0x… )
Double-click on this value and copy
IMPORTANT: Save in a safe place (a permanent file). Do not share this key. The Content Fabric is designed to be trustless - we do not keep a copy of your key and cannot reset or recover it for you. Until you save a copy of your key somewhere it only exists in your browser's local storage, which can get erased if you choose to wipe your browser history.
At this point, you may still see some warnings about package vulnerabilities. As we are only running local command line scripts (rather than using node.js to run a web app that accepts input from the outside world) these are safe to disregard.
Edit the file elv-client-js/TestConfiguration.json
To connect to our demo network, this file should be set to contain the following:
This documentation uses scripts in directory /elv-client-js/testScripts.
These will eventually be replaced by new scripts in directory /elv-client-js/utilities. To minimize disruption to existing customer workflows, the existing testScripts directory and its contents will remain for the time being, but deprecation warning messages will be added to the old scripts as corresponding replacements become available.
Differences between old and new scripts are detailed in the following Google doc:
The Production Master object contains links to your original source material. It is not directly playable, but is used to generate a playable Mezzanine object.
To create a Production Master, you will need the following:
Your Production Master Content Type name or ID
Your Production Master Library ID
One or more media files
(optional) An asset ID (generally your internal ID for a title)
Get your Production Master Content Type name and/or ID ⇡
Each tenant of the Content Fabric has a number Content Types created for them. These provide a way of customizing the structure of your fabric objects.
If you click on Content Types on the left side you will see a list of these types, among which should be one named "TENANT_NAME - Title Master".
If you click on this item, you will see a detail screen where you can select and copy the Name and Object ID for this Content Type. When you run commands to create Production Masters, you will need to supply either the name or the ID of this content type, e.g.:
--type "TENANT_NAME - Title Master"
or
--type iq__...(your 'Title Master' content type ID - content type IDs start with "iq__")
NOTE: In the instructions below there are a number of operations done via browser. These can be done programmatically as well and we can provide code samples as needed.
Click on Content in the left sidebar to get to your list of libraries.
Each tenant also has a number of libraries created for them, including one to hold Production Masters - it should be labeled "TENANT_NAME - Title Masters". Click on this item to see a list of objects currently in the library (initially it may be empty).
On the next screen, click on the Library Info tab to find the Library ID. When you run commands to create Production Masters, you will need to supply this ID, e.g.:
--library ilib...(your 'Title Masters' library ID - library IDs start with "ilib")
Here is a sample command line to generate a Production Master using a file on AWS S3. Once you have the required information, substitute it into the sample below (if you do not need to attach an asset ID, you can omit the --ip-title-id line):
NOTE: Our convention in this case is to omit the "s3://" prefix and bucket name from the start of file path, i.e. use bbb_sunflower_1080p_60fps_stereo_abl.mp4 instead of s3://BUCKET_NAME/bbb_sunflower_1080p_60fps_stereo_abl.mp4. If the file is in a subdirectory, start with the name of the subdirectory, without any leading slash character (/)
Here is a sample command line to generate a Production Master using a local file. Once you have the required information, substitute it into the sample below (if you do not need to attach an asset ID, you can omit the --ip-title-id line):
Check output from CreateProductionMaster.js script ⇡
When you run the CreateProductionMaster.js script, the server examines the file(s) for audio and video streams, then makes a simple guess about what should be included in the mezzanine.
You should see output like the following:
Creating Production Master

Production Master
{ done: true, uploadedFiles: 1, totalFiles: 1 }

Production master object created:
        Object ID: iq__2QEH2nqrLkwZpkNoguw1RGW7hFK4
        Version Hash: hq__9v2JY21ESnsvNdwWwgJrjiw7jHWv5nXik6quVn6FUgDxbgTgJT8toxBVb1ShZZH4mcFSFcJUJJ
If you included any non-media files in the --files list, you will also see warnings at the end of the output complaining Failed to create media.Source from file. These can be ignored as long as you included at least one media file.
If the server did not find a presupplied stereo (2-channel) audio stream among the files, you will see the following warning:
WARNING: no audio stream found
If the server did not find a video stream among the files, you will see the following warning:
WARNING: no video stream found
A Production Master contains one or more Variants. A Variant is one version of the original title (this allows you to create different content versions for particular countries or distribution channels). The CreateProductionMaster.js script creates a single Variant named default.
Clicking on the Show Metadata button and drilling down into production_master → variants → default → streams will reveal what files and stream indexes the server has chosen to include in this "default" Variant.
Set Mezzanine object visibility to 'Viewable' - via browser ⇡
In order to make the Mezzanine viewable for your site, you must set overall permission level for object to Viewable.
From the object details page, click the Content Info tab, then change the Permissions: line to Viewable.
If you cannot change the Permissions: line, make sure you are logged in to the Fabric Browser with the private key used to create the mezzanine.
Set Mezzanine object visibility to 'Viewable' - via command line ⇡
In order to make the Mezzanine viewable using the command line, you will need to know the following:
The ID of your Mezzanine object (starts with "iq__")
Grant Group Permissions on Production Master object - via browser ⇡
In order to let other Content Admins work with your Production Master object, you must grant group permissions to an Access Group.
From the object details page, click the blue Groups button at top - you should see a screen with the Access Group field already chosen for you, set to "TENANT_NAME Content Admins".
Check the Manage box, then click Submit.
Grant Group Permissions on Production Master object - via command line ⇡
In order to grant group permissions via the command line, you will need to know the following:
The ID of your Production Master object (starts with "iq__")
The Address of your "TENANT_NAME Content Admins" group (starts with "0x")
What permission level you would like to grant (for your Content Admins group, choose manage)
see
access
manage
You can find the Address of your group by clicking on the blue Groups button at top when you are browsing the details of any object. You can choose a group from the Access Group dropdown, then double-click the Address field to select it and copy to your clipboard.
(If needed) Change streams on Production Master Variant ⇡
If you need to make any changes to the Variant's stream selections (e.g. because the server did not choose the desired streams, or if you wish to add more audio streams) you can use scripts to add/edit/remove Variant streams. In order to use these scripts, you will need to look at the Production Master's existing stream information.
You can inspect stream information for files and Variants in the fabric browser by clicking on the Show Metadata button and drilling down by clicking on productionmaster → sources → (filename) → streams and productionmaster → variants → (variant name) → streams. (Clicking on a downward pointing triangle ▼ will expand all details for a line item, clicking on an expanded line item will collapse it)
Alternately, you can use the ProductionMasterInfo.js script, which will output a subset of this information:
In order add a stream to a Variant, you will need to supply the following information:
The ID of your library that contains your Production Masters (starts with "ilib")
The ID of your Production Master object (starts with "iq__")
The internal name ("key") for the Variant (usually "default")
What internal identifier (called a "stream key") to give your stream. This key can be anything you want, and is not displayed to the end user, but it is recommended to choose something that contains no spaces, uses only letters/numbers/dashes, and describes the media type and purpose, e.g. audio-french or audio-en-surround. If you must include spaces, then surround the key with quotation marks on the command line.
An externally visible label for the stream. This is what the end user sees in controls to choose audio and/or subtitle streams (see section Language Codes and Labels). If it contains spaces or punctuation, you must surround with quotation marks, e.g. "Director's commentary".
The name of the file in the Production Master that contains the desired stream(s) to use. (An audio stream in your Variant can be created from multiple streams in the original file). This is the filename as it appears in the file list for your Production Master object, and should not contain S3 bucket names or subdirectory prefixes.
The stream index(es) to use from the file. Note that stream indexes start at zero, so if your file contains 8 streams and you want to use the last 2, the stream indexes would be 6 and 7. (Use of multiple stream indexes is only valid for audio streams. Video streams in your Variant can only use one stream index from the source file. For audio, currently only a maximum of 2 indexes can be specified, but support for Dolby mixdown is scheduled to be added soon)
(Only for audio streams using more than one stream index) The mapping to use to combine the source audio streams. Currently only 1 mapping is supported, 2MONO_1STEREO, which will map the first stream index to the left channel and the second stream index to the right channel.
(Only if the stream is the default to use) The flag --isDefault. If omitted, the stream is assumed to be an alternate stream and will not be chosen by default unless it is the only stream of its type (audio or subtitle) or if the user has a matching browser/player language preference configured.
The command to add the stream is then would resemble the following:
(note that --mapping, SECOND_STREAM_INDEX, and --isDefault would not always be included)
Once you run the command, it will output the new version hash for the Production Master. You will need this value in order to create a mezzanine, unless you have more streams to add to the Variant, in which case you will need the version hash that is output by your final VariantAddStream.js command.
Edit existing stream in Production Master Variant ⇡
The command to edit a stream is similar to the one for adding a stream. In order edit a stream in a Variant, you will need to supply the following information:
The ID of your library that contains your Production Masters (starts with "ilib")
The ID of your Production Master object (starts with "iq__")
The internal name ("key") for the Variant (usually "default")
The internal identifier (called a "stream key") for the stream to edit.
An externally visible label for the stream. This is what the end user sees in controls to choose audio and/or subtitle streams (see section Language Codes and Labels). If it contains spaces or punctuation, you must surround with quotation marks, e.g. "Director's commentary".
The name of the file in the Production Master that contains the desired stream(s) to use. (An audio stream in your Variant can be created from multiple streams in the original file). This is the filename as it appears in the file list for your Production Master object, and should not contain S3 bucket names or subdirectory prefixes.
The stream index(es) to use from the file. Note that stream indexes start at zero, so if your file contains 8 streams and you want to use the last 2, the stream indexes would be 6 and 7. (Use of multiple stream indexes is only valid for audio streams. Video streams in your Variant can only use one stream index from the source file. For audio, currently only a maximum of 2 indexes can be specified, but support for Dolby mixdown is scheduled to be added soon)
(Only for audio streams using more than one stream index) The mapping to use to combine the source audio streams. Currently only 1 mapping is supported, 2MONO_1STEREO, which will map the first stream index to the left channel and the second stream index to the right channel.
(Only if the stream is the default to use) The flag --isDefault. If omitted, the stream is assumed to be an alternate stream and will not be chosen by default unless it is the only stream of its type (audio or subtitle) or if the user has a matching browser/player language preference configured.
The command to edit the stream is then would resemble the following:
(note that --mapping, SECOND_STREAM_INDEX, and --isDefault would not always be included)
Once you run the command, it will output the new version hash for the Production Master. You will need this value in order to create a mezzanine, unless you have more streams to edit, in which case you will need the version hash that is output by your final VariantEditStream.js command.
Remove existing stream from Production Master Variant ⇡
In order remove a stream from a Variant, you will need to supply the following information:
The ID of your library that contains your Production Masters (starts with "ilib")
The ID of your Production Master object (starts with "iq__")
The internal name ("key") for the Variant (usually "default")
The internal identifier (called a "stream key") for the stream to remove.
The command to edit the stream is then would be the following:
Once you run the command, it will output the new version hash for the Production Master. You will need this value in order to create a mezzanine, unless you have more streams to remove, in which case you will need the version hash that is output by your final VariantRemoveStream.js command.
A Mezzanine object contains transcoded media optimized for adaptive bitrate (ABR) streaming. Depending on the ABR profile you choose, it is playable via HLS and/or DASH with DRM (you also have the option to offer playout in the clear).
To create a Mezzanine, you will need the following:
The Latest Version Hash of your Production Master object (see "Find the latest version hash for your Production Master" section below)
Your Mezzanine Content Type name or ID
Your Mezzanine Library ID
A JSON file containing an ABR Profile specifying bit rates, playout formats, and DRM information
(optional) An asset ID (generally your internal ID for a title)
NOTE: In the instructions below there are a number of operations done via browser. These can be done programmatically as well and we can provide code samples as needed.
Find the latest version hash for your Production Master ⇡
Any script that creates and/or modifies a Production Master will output the new version hash for the object, e.g.:
Adding stream 'audio' to variant 'default'...
Writing metadata back to object...
Finalizing object...
New version hash: hq__N8VZbpdEtRyTsuPtnczwKNi2hgFNu3F7CJEHmroPqbwEaJNwoL9tiGGLEvi7zm4ZpGmQrntWT
Done.
Version hashes always start with the characters hq__ and this value can be copied and pasted in your command terminal window.
Alternately, you can also look up the version hash in the Fabric Browser and copy from there:
In your browser, if you click on Content in the left sidebar, then click on your Title Masters library, you should be able to find your new Production Master object.
(If you are already on the page that lists objects in the library you may need to click the refresh icon to see the new object)
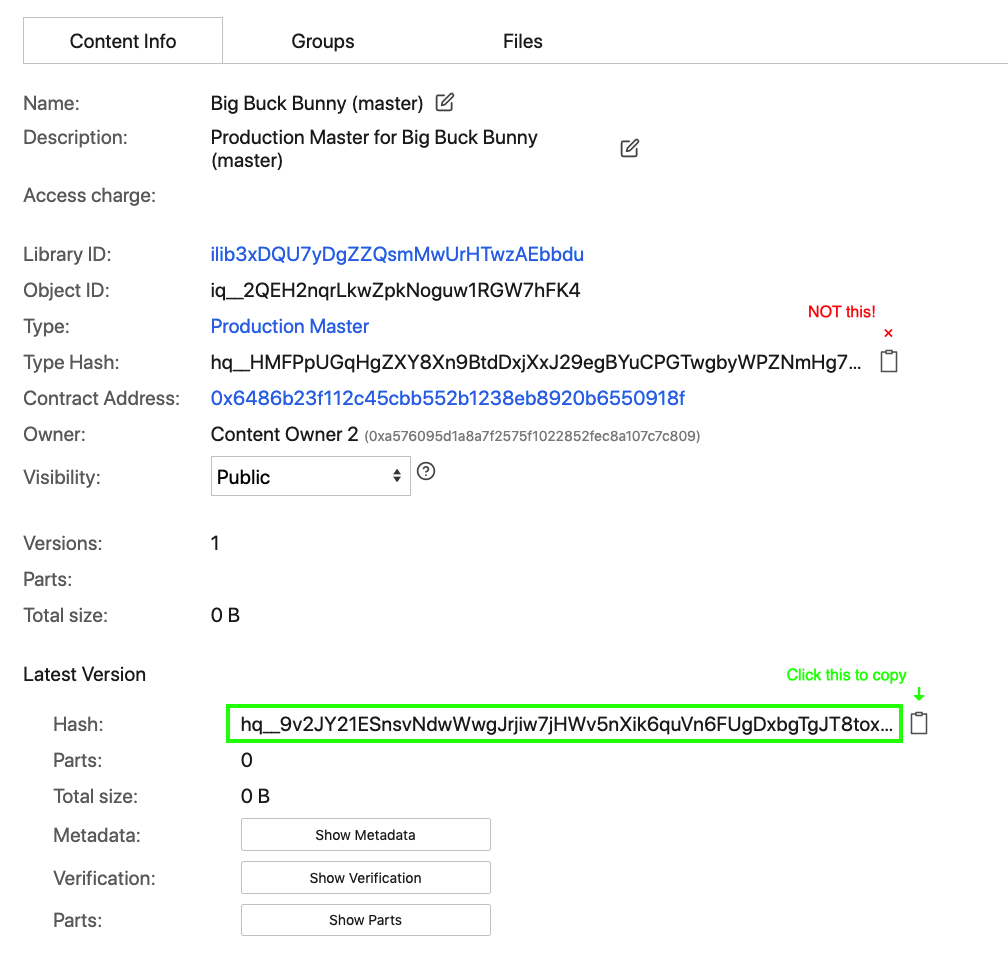
Clicking on the object will show you details about the object. For the next step (generating a mezzanine) you will need the Latest Version Hash for the object. This value (hq__9v2JY2… for this example) can be copied by clicking on the clipboard icon as shown below. It is also listed in the output from the CreateProductionMaster.js script.
Click on Content Types on the left side and click on the one named "TENANT_NAME - Title".
You will see a detail screen where you can select and copy the Name and Object ID for this Content Type. When you run commands to create Mezzanines, you will need to supply either the name or the ID of this content type, e.g.:
--type "TENANT_NAME - Title"
or
--type iq__...(your 'Title' content type ID - content type IDs start with "iq__")
Click on Content in the left sidebar to get to your list of libraries.
Click on the one labeled "TENANT_NAME - Titles", then click on the Library Info tab to find the Library ID. When you run commands to create Mezzanines, you will need to supply this ID, e.g.:
--library ilib...(your 'Titles' library ID - library IDs start with "ilib")
An ABR Profile contains information on what formats, resolutions and bitrates to offer for streaming playout, as well as any DRM and/or watermarking information.
There are JSON files containing commonly used profiles in elv-client-js/testScripts/
abr_profile_4k_clear_store_encrypted.json
abr_profile_4k_clear_store_unencrypted.json
abr_profile_4k_drm.json
abr_profile_clear_store_encrypted.json
abr_profile_clear_store_unencrypted.json
abr_profile_drm.json
The 4k files are specifically for offering 16:9 material at 3840x2160 resolution.
For most content we recommend using the abr_profile_drm.json file, which contains resolution ladders for a variety of aspect ratios. (For material with 16:9 aspect ratio, this file's top ladder rung is 1920x1080 @ 9.5 mbps)
The *_clear_* files are for publishing without DRM. For items that are intended to be publicly accessible, use the profiles that end in _store_unencrypted.json. If there is a chance that you might want to change the mezzanine later to have DRM, use the profiles that end in _store_encrypted.json (however, these offerings will not be playable to users without a Fabric private key that has been granted access to it).
Once you have the required information, substitute it into the sample command below (if you do not need to attach an asset ID, you can omit the --ip-title-id line):
Your output from the previous command should look something like this:
Creating ABR Mezzanine...
Starting Mezzanine Job(s)
Library ID ilib4JFY7hontNKJJmM4XnZaweTbH9tq
Object ID iq__4N1gG59cE1YzAL3NfRs39rFVTq8q
Offering: default
Write Token: tqw_4SiNg6kktmRGmAjLXjeFzt8s8C2Lbo5Bo
Write Node: https://host-38-142-50-110.contentfabric.io/
The Object ID identifies your new Mezzanine, you will need this value for subsequent commands.
In your browser, if you click on Content in the left sidebar, then click on your Titles library, you should see your new Mezzanine object.
(If you are already on the page that lists objects in the library you may need to click the refresh icon to see the new object)
If you go into the "TENANT_NAME - Title Mezzanines" library in your browser you should see the new mezzanine object.
(If you are already on the object list page you may need to click the refresh icon to see the new object)
Drilling down into it, you should see some information about transcoding progress (you will not be able to play it until transcoding has finished and you have finalized the object):
In most cases, the percentage value shown is an average of 2 values (audio percent done and video percent done). The audio generally processes much more quickly, so you will see the value climb quickly to just above 50%, then progress more slowly.
Divide the "duration_ms" field by 1000 to get seconds elapsed.
Depending on the format, bitrate and complexity of the original source material, and the speed of transfer between your S3 bucket and the Content Fabric node, it can take anywhere from 1x to 8x the actual duration of the program to complete transcoding.
Once both jobs show a "run_state" of "finished", you are ready for the next step, finalization.
While the command itself should complete quickly, it can take 2-3 minutes for the finalized content to become visible in the browser. (Behind the scenes, the nodes in the fabric are distributing parts among themselves)
In the browser, click the refresh icon to update your view, then click on the Display tab to see the finalized content.
Grant Group Permissions on Mezzanine object - via browser ⇡
(Identical process as for the Production Master object)
From the object details page, click the blue Groups button at top - you should see a screen with the Access Group field already chosen for you, set to "TENANT_NAME Content Admins".
Check the Manage box, then click Submit.
Grant Group Permissions on Mezzanine object - via command line ⇡
(Identical process as for the Production Master object)
In order to grant group permissions via the command line, you will need to know the following:
The ID of your Mezzanine object (starts with "iq__")
The Address of your "TENANT_NAME Content Admins" group (starts with "0x")
What permission level you would like to grant (for your Content Admins group, choose manage)
see
access
manage
You can find the Address of your group by clicking on the blue Groups button at top when you are browsing the details of any object. You can choose a group from the Access Group dropdown, then double-click the Address field to select it and copy to your clipboard.
In general, a 'forced' subtitle stream will require that the mezzanine ALSO has an audio stream with the SAME language code - otherwise, the player will never use that subtitle stream.
For example, if you are adding a forced caption set for English (lang code en) then the offering must also contain an audio stream with lang code en.
Note that this causes a problem for Chinese, which has different language codes for spoken vs. written language - for 'forced' Chinese captions, use the audio language code (yue or cmn) rather than the text language code (zh-hans or zh-hant). If your offering contains both Mandarin (cmn) and Cantonese (yue) audio streams then you will need to add your Chinese forced caption file twice, once using cmn and once using yue.
NON-forced Chinese captions should still use the appropriate text language codes (zh-hans or zh-hant).
The language code for your captions (see section Language Codes and Labels). If the captions are 'forced' and in Chinese, see previous major bullet point above about what language code to use.
A label to show in the player UI for your captions
If you wish to set a label in the same language as the subtitles, copy and paste from section Language Codes and Labels.
If the captions are forced, they are not supposed to be shown as an option in player UIs, but it is still good to set a label like "English (forced)" so that if a player mistakenly lists it as an option it will be apparent what is happening.
Whether or not you would like to store the captions in encrypted format on server (default false)
Whether to use as the default caption stream
Whether to adjust all caption timestamps by a fixed number of seconds (positive or negative)
Add the following optional parameters above the --file line if desired:
add the caption stream to an Offering other than 'default': --offeringKey THE_OFFERING_KEY \
make this the default caption stream: --isDefault \
mark these captions as forced: --forced \
store the captions in encrypted format on server: --encrypt \
add a fixed number seconds to all timestamps: --timeShift NUMBER_OF_SECONDS \
subtract a fixed number seconds from all timestamps: --timeShift -NUMBER_OF_SECONDS \
specify the stream key used internally in metadata to refer to caption stream: --streamKey DESIRED_STREAM_KEY \
Grant Group Permissions on Mezzanine object - via browser ⇡
(Identical process as for the Production Master object)
From the object details page, click the blue Groups button at top - you should see a screen with the Access Group field already chosen for you, set to "TENANT_NAME Content Admins".
Check the Manage box, then click Submit.
Grant Group Permissions on Mezzanine object - via command line ⇡
(Identical process as for the Production Master object)
In order to grant group permissions via the command line, you will need to know the following:
The ID of your Mezzanine object (starts with "iq__")
The Address of your "TENANT_NAME Content Admins" group (starts with "0x")
What permission level you would like to grant (for your Content Admins group, choose manage)
see
access
manage
You can find the Address of your group by clicking on the blue Groups button at top when you are browsing the details of any object. You can choose a group from the Access Group dropdown, then double-click the Address field to select it and copy to your clipboard.
Which media streams to offer (e.g. if your Production Master Variant has more than one audio stream)
Watermark (text or image)
Trimming (entry and exit points)
When the CreateABRMezzanine.js script is run, it creates a single Offering named default.
The OfferingCopy.js script allows you to duplicate an existing Offering, after which you can modify the copy to change the playout options (see "Adding / removing playout options from an Offering" section below):
In the Fabric Browser, when you are on the Display tab for your Mezzanine, click on the Advanced Controls button to access additional options. The Offering pulldown menu will allow you to choose other Offerings besides "default".
Adding / removing playout options from an Offering ⇡
You can make changes to an Offering (either the default, or one you have created via the OfferingCopy.js script) to modify playout options.
If you omit --offeringKey then default will be assumed.
Optionally, the --width and/or --bitrate options can be omitted, and the script will scale the existing top rung based on --height.
Note that if you supply both --width and --height but the resulting aspect ratio would differ more than 5% from the existing top rung's aspect ratio the script will halt with an error. If you would like to add anyway, add --ignoreAspectRatio to the command.
Note also that only lower quality rungs can be added to an existing Offering. The new rung's bitrate must be lower than the existing top rung, and height and width must be less than or equal to the existing top rung.
For example, if your top rung is 1920x1080 @ 9,500,000 bps:
OK:
1920x1080 @ 7,000,000 bps
1280x720 @ 7,000,000 bps
Not OK:
1920x1080 @ 12,000,000 bps (bitrate must be less than top rung)
3840x2160 @ 7,000,000 bps (height and width must be equal to or smaller than top rung)
1280x720 @ 9,500,000 bps (bitrate must be less than top rung)
Note that in special cases, your Offering's video stream may not be named video - if this is the case, use --streamKey STREAM_NAME to specify the actual name of the stream. (You can use the OfferingListRungs.js script to see the names of your Offering's streams)
Removing a rung from an Offering's video playout resolution ladder ⇡
The OfferingRemoveVideoRung.js script will allow you to remove an existing rung from an Offering's video resolution ladder:
If you omit --offeringKey then default will be assumed.
To look up the value of --rungKey, use the OfferingListRungs.js script (see above). Video rungs are generally named "video_WIDTHxHEIGHT@BITRATE", e.g.: video_1280x720@4500000, but this is not guaranteed - use the OfferingListRungs.js script to show all the rung names.
You are not allowed to remove the top rung from the ladder, if you try the script will halt with an error.
Note that in special cases, your Offering's video stream may not be named video - if this is the case, use --streamKey STREAM_NAME to specify the actual name of the stream. (You can use the OfferingListRungs.js script to see the names of your Offering's streams)
Adding a stereo stream created from 2 mono streams to a Production Master Variant ⇡
In the case where the source has left and right audio stored individually as mono streams, adding a stereo stream requires using the VariantAddStream.js script and specifying the stream indexes to use, as well as the mapping type 2MONO_1STEREO.
For example, The following assumes that your source audio streams are in file 'MyMovie.mp4', at stream indexes 1 and 2, is English, and should be the default audio choice.
Adding a stereo stream created from a single mono stream to a Production Master Variant ⇡
In the case where the source only has a single mono stream, adding a stereo stream is similar to the case where you have 2 mono channels (above), except that you would specify the same source stream index twice.
For example, The following assumes that your source audio stream is in file 'MyMovie.mp4', has stream index 1, is English, and should be the default audio choice.
Adding a 'clear playout' Offering to a DRM-protected Mezzanine ⇡
The following assumes that you created your Mezzanine using the abr_profile_drm.json profile, which will result in a default Offering that only offers DRM playback:
Below is a table of codes and labels for some of the most commonly encountered languages. To look up a language not on this list, visit the IANA Language Subtag Registry
Note that some references may capitalize letters appearing after a dash, e.g. "pt-BR" instead of "pt-br".
language
code
label
note
Arabic
ar
اَلْعَرَبِيَّةُ
Bangla / Bengali
bn
বাংলা
Chinese (Cantonese)
yue
廣東話
(spoken) for audio streams only
Chinese (Mandarin)
cmn
普通话
(spoken) for audio streams only
Chinese (Simplified)
zh-hans
简体中文
(written) for text streams only
Chinese (Traditional)
zh-hant
繁體中文
(written) for text streams only
Danish
da
Dansk
Dutch
nl
Nederlands
Dutch (Netherlands)
nl-nl
Nederlands
specifically as spoken/written in the Netherlands
English
en
English
English
en-gb
English (United Kingdom)
specifically as spoken/written in the United Kingdom